OBS Studio, or Open Broadcaster Software, can easily be named as one of the best streaming and recording programs to date. In it, you will find everything you need and even more: record video from screen, camera or a specific window, as well as a set of settings indispensable for streaming. And it is free. To understand why OBS is good, let's go through all aspects of it.
Vendor | Developed by community (original author - Hugh Bailey) |
Newest version (for Windows) | 26.1.0 |
Operating systems | Windows 8, 8.1, 10; macOS 10.13 and higher; Linux |
Installer file size | 73 MB |
Menu languages | 39 |
Key modules | Streaming and recording |
Extra features | Virtual camera, audio mixer, scene editor |
License | Free |
- Windows 8 / 8.1 / 10 with DirectX 10.1 compatible GPU;
- macOS 10.13 or later with Intel CPU and OpenGL 3.3 compatible GPU;
- Linux with x window system and OpenGL 3.3 compatible GPU;
Interface
Immediately after installing we are greeted by the main program window. It is in a simple and minimalist style, allowing us to understand everything quickly. I first opened OBS, and in about 10 minutes and without tutorials I got a grasp of it.
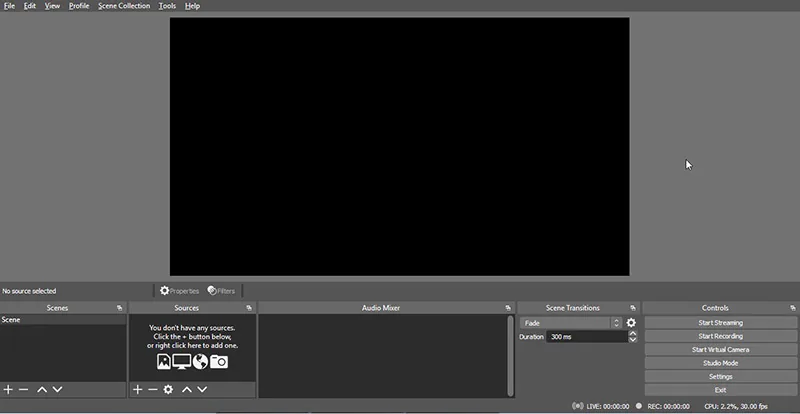
In addition to the top panel, you can select six main interface elements:
- Main screen. Occupies most of the main window and broadcasts what you record. During the recording, you can place other elements or change window size.
- Scenes. Here you can create and delete scenes for editing. Using multiple sources - screen, camera, microphone - switching between scenes is useful for video streaming.
- Sources. This element is designed to process the scene, namely to assign it certain functions, such as display or game capture, adding text, images, media files, new audio inputs, etc.
- Audio mixer - to adjust the sound from various inputs such as desktop audio or microphone.
- Scene transitions. Adjusts the view and transition time between scenes.
- Controls. This tab, similarly to the main menu, allows you to control basic tasks, e.g. start and stop streaming/recording, change settings, start the virtual camera, go to Studio mode, and go to settings and exit the program.
Settings
Options in OBS are divided into seven categories:
- General. Language, theme (dark, akri, rachni, or system), output, preview, system tray, multiview, etc.
- Stream. Twitch is connected by default, but it can be changed via Connect Account.
- Output. In 2 modes: simple and advanced. Simple: basic streaming and recording settings - bitrate, encoder, quality. Advanced: streaming, recording, audio, and replay buffer. In each category there are more options.
- Audio. Sample rate (44.1 kHz and 48 kHz), channel (mono or stereo), global audio devices, decay rate, and hotkeys.
- Video. Base and output resolution, downscale filter, and FPS values.
- Hotkeys. Assign hotkeys to almost all available actions, e.g. set start and stop for recording.
- Advanced. Select renderer (e.g., DirectX), color format, stream delay, automatic reconnection, and a couple of network options.
Features
Given that OBS is free, it's nice to see that it contains many useful features. Among the main ones are:
Recording. The primary function of OBS. Options are recording a screen, a single window, browser, game, or video from camera. Each option can be customized using the Sources tab. To start recording, simply click Start Recording or the assigned hotkey, for example the space key.
Streaming. OBS is undoubtedly one of the best streaming software for Twitch, YouTube, Facebook Live, etc. Video bitrate, encoder and audio bitrate are available to configure. If you plan to stream gameplay only, select Game Capture.
Audio Mixing. Of course, this is not a full-fledged mixer with FX. Still, it allows you to adjust volume from different sources at once, during recording or streaming as well.
Scene editor. Each scene is a set of settings that can be customized in detail. Sources are:
- Audio input/output - connect external audio devices;
- Browser;
- Color - fill the scene with a specific color;
- Display - broadcast the screen and all its elements;
- Game - only the game in full screen. If you press Alt+Tab the game during recording or streaming, it will continue to show on the screen, so you do not have to worry about displaying something else by accident.
Image / Slideshow. Add images to the screen while creating a slideshow, change its size or position, adjust the time between transitions. Media source. Similar to images, it allows you to add a variety of media files such as music and videos, adjust size and position of video on the screen.
Studio Mode. Change scenes so that viewers do not see the transition process. Of course, this feature is primarily useful for streamers - mainly at the beginning and end of streams for screensavers.
Text. A simple feature to add text to the screen, and again, adjust the font, size, position.
Video capture. Required if you want to record video from the camera. Recording can be done in parallel with display or game capture.
Virtual camera. Use your webcam to broadcast in Zoom, Discord, etc. (go to OBS Virtual Camera settings). Window capture to record a single window, whether it is a program, game (in window mode), or a browser.
Note: scenes order will prioritize the main window, for instance, if a picture is under the video, it will not be visible.
Audio / Video parameters
- Sample rate. You can record sound at 44.1 kHz or 48 kHz. You can also choose the channels you need, among which are Stereo, Mono, 2.1, 4.0, 4.1, 5.1, 7.1.
- Global audio devices. You can use two desktop audio and four mic or auxiliary audio to record. You can configure them in audio settings. If you do not need them, you can simply turn them off.
- Meters. Controls decay rate (fast, medium or slow), and peak meter type (sample or true). If you don't understand it, no problem - start the automatic scan mode, which will set all the necessary settings.
Video settings in OBS are divided into several categories. For example, in Settings - Video, you can configure Base or Canvas, Output or Scaled resolution. The aspect ratio will be displayed. Downscale filters are available:
- Bilinear. Very fast, but blurry;
- Area. Weighted sum. 4/6/9 samples;
- Bicubic. Sharpened scaling, 16 samples;
- Lanczos. Sharpened scaling, 32 samples.
Also, one can choose FPS in values from 10 to 60. While 60 is best for video recording, 30 is ideal for streaming. Depending on FPS, the CPU load will also differ, so if you have a weak PC or laptop, it is better to set a lower value.
Another category of video settings includes Encoder, Bitrate, CPU Usage, and Format. The best encoder to use is x246, it provides high image quality, yet also loads the CPU. Bitrate will primarily depend on the desired image quality or screen extension. For example, at 1920x1080 resolution, it is desirable to set the bitrate in the range of 4K - 8K Kbps. If you don't know what bitrate to set, just click Tools - Auto-Configuration Wizard, and OBS will set the recommended settings.
CPU presets include Ultrafast, Fast, Medium, Slow, Placebo, etc. Finally, OBS can record video in MP4, MKV, FLV, MOV, TS, M3U8 formats.
How to record a screen with sound in OBS?
Option 1: Recording screen with system sounds.
Step 1. Download, install and launch OBS Studio.
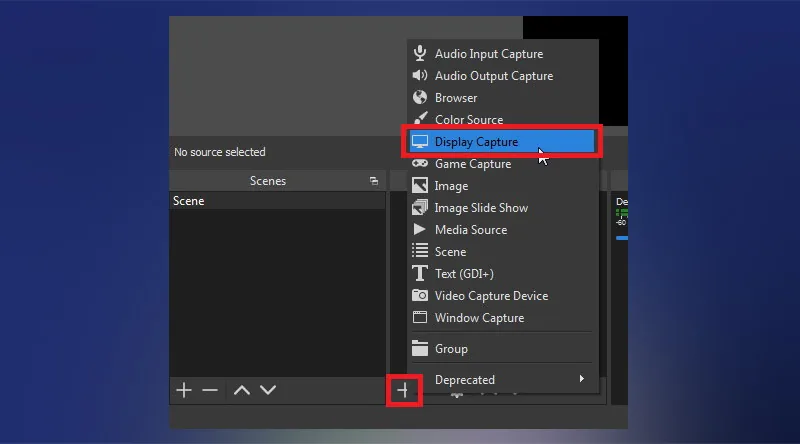
Step 2. Choose the scene and add Display Capture or any other capture type.
Step 3. Preview default settings for desktop audio in the audio mixer, tweak if needed.
Step 4. Click Start Recording on the controls menu and your video will include system sounds.
Option 2: Recording screen with microphone sound.
Step 1. Download, install and run OBS.
Step 2. Choose the scene and add Display Capture or any other capture type.
Step 3. Right click on Sources and hit Add, or hit “+” at the bottom.
Step 4. Choose Audio Input Capture and select your microphone.
Testing
So after reviewing all the features, we had to check how they actually work and how much memory it would consume to capture screen videos. To get common results, we decided to record a 1-minute video - this way we all can calculate how much memory OBS will use, depending on video duration. Also, in 2 popular formats, MP4 and MKV.
Format | Duration | Encoder | Resolution | File size | CPU preset | CPU load |
MP4 | 1 min | x264 | 1366x768 | 21.4 Mb | Very fast | 26% |
MKV | 1 min | x264 | 1366x768 | 18.1 Mb | Very fast | 24% |
As for scenes, all functions worked properly. Audio Input and Output allow you to easily add both system sounds and an external microphone to one scene. Image and Slideshow were just as calmly added. When recording, streaming, and using Virtual Camera, they are displayed continuously on the screen.
Virtual camera worked great, we tested it first in Discord. In video settings we simply change the camera to OBS Virtual Camera, then click Start Virtual Camera and as we saw it had perfectly transmitted everything to Discord.
We selected to stream a movie as a Media Source. It started, though if you change the scene and go back, the movie starts over from the beginning. Although this can be annoying, we can avoid it by correctly setting the scene. This can even be done during streaming, using Studio Mode - changes are not visible to viewers.
As for the impact on FPS, it is relatively small. With a powerful PC frame loss is small - within 4-8 FPS, while 8-13 FPS on weaker computers. It can be reduced by setting a lower quality video recording and reducing the CPU load.
Verdict
After reviewing and testing all OBS features, it is safe to say that it is one of the best programs for capturing video and streaming. An excellent scene editor allows you to control actions during streams as precisely as possible. The fact that OBS is free makes it accessible to anyone, and furthermore, it does not consume much memory and resources, makes it the perfect choice for many users.
- Xsplit. Primarily suitable for streaming. Low CPU Usage. Good for beginners. Has a free version.
- Wirecast. Has Free trial. Cost $599 for standard and $799 for Pro version. Made primarily for streaming.
- Screencastify. Video recorder. Can capture screen. Available as an extension in Google Chrome. Allows you to select the mouse while recording and draw on the screen.
- Camtasia. 2 in 1: Screen recorder and editing tool. Has a free trial. Like most editors, it allows you to apply effects, text, filters, and more.
- Free
- Scene editor
- Excellent for streaming
- Basic audio mixing only
- Lack of guides and tutorials