Building a Kubernetes cluster with AWS EKS
- Created at:
- Updated at:

AWS EKS, or Elastic Kubernetes Service, is a fully managed service that makes it easy to run Kubernetes on AWS without needing to install, operate, and maintain your own Kubernetes control plane or nodes. It's a service that allows developers to deploy, manage, and scale containerized applications using Kubernetes on AWS.
Kubernetes is an open-source system for automating deployment, scaling, and management of containerized applications. It groups containers into clusters for easy management and discovery. AWS EKS provides a Kubernetes-native experience with the security, scalability, and reliability of the AWS cloud.
One of the key benefits of AWS EKS is its seamless integration with AWS services. This means you can use the full functionality of the AWS environment, such as auto scaling and multi-availability-zone deployment, while still being able to use Kubernetes-native tools. This makes AWS EKS an excellent choice for teams that are already using Kubernetes but want to take advantage of the benefits of AWS.
EKS Cluster Architecture
Control Plane
EKS automatically deploys and manages the Kubernetes control plane. The control plane is where all the decisions are made, including the scheduler's decisions about where to run your workloads. The control plane also includes the API server, which exposes the Kubernetes API and is the point of interaction between users and the cluster.
The EKS control plane has several components including etcd, a consistent and highly available key-value store used as Kubernetes’ backing store for all cluster data. It is responsible for implementing locks within the cluster to ensure that there are no conflicts between the nodes.
It also includes the Kubernetes API server, which is the hub for all operational and management functions in the cluster. It provides the frontend to the cluster's shared state, allowing users to configure workloads and containers across worker nodes.
Worker Nodes
The worker nodes are where your applications run. Each node is a separate instance of an AWS EC2 that hosts your applications and services.
Worker nodes in EKS are managed in groups known as node groups. A node group is a set of EC2 instances that share similar configurations such as instance type, AMI type, and networking. These node groups can be scaled up or down based on the needs of your applications, allowing for flexibility and optimization of resources.
Each worker node runs a Kubernetes node service (kubelet) which is responsible for communicating with the master node and running pods. pods are the smallest and simplest unit in the Kubernetes object model that you create or deploy. A pod represents a running process on your cluster and encapsulates an application's container, storage resources, and network IP.
Networking
EKS networking determines how different components within the cluster communicate with each other and the outside world. EKS supports several networking plugins, but the most commonly used is the Amazon VPC CNI plugin.
The VPC CNI plugin for Kubernetes offers native AWS networking capabilities for Kubernetes pods. It allows Kubernetes nodes in EKS to use the same VPC networking functionalities as EC2 instances, such as security groups, network ACLs, and VPC flow logs. This provides a secure network connection between your applications and the underlying network layers.
Kubernetes Cluster with EKS: Step by Step
Prerequisites
To start, you'll need an active AWS account. Next, you'll need to have the AWS Command Line Interface (CLI) installed and configured on your local system. The AWS CLI is a unified tool that allows you to manage your AWS services from the command line. It's a crucial tool for interacting with AWS EKS.
Finally, you'll need to install kubectl, the command line tool for Kubernetes. kubectl is used to deploy and manage applications on a Kubernetes cluster. It's also necessary to have eksctl, a simple CLI tool for creating and managing clusters on EKS, installed on your system.
Step 1: Setting Up Your Environment
With the prerequisites in place, the next step is setting up your environment. Begin by opening the AWS Management Console and navigating to the EKS service. Here, you'll see a dashboard with an overview of your EKS resources.
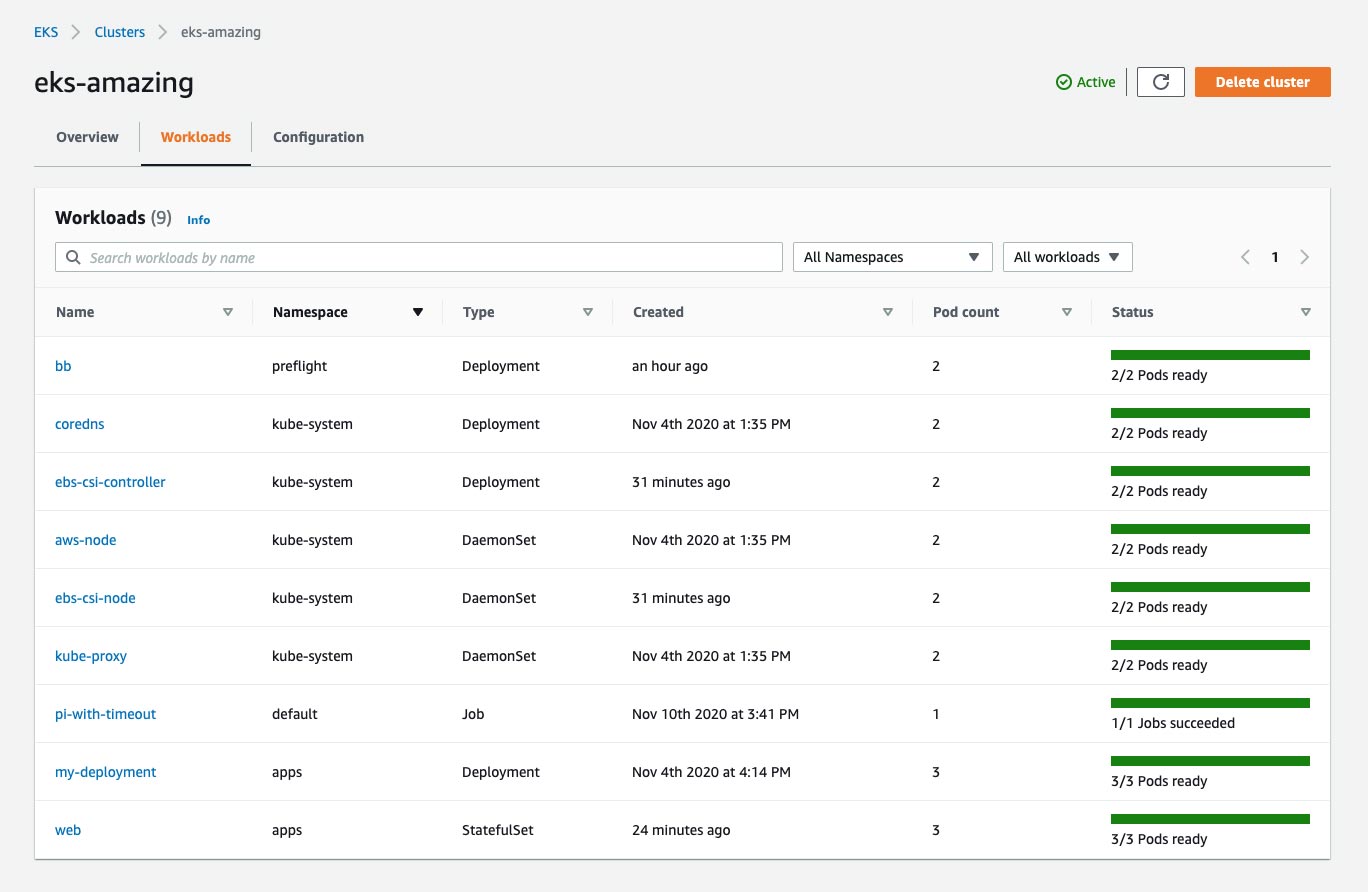
Source: AWS
To set up the command line tools, you'll need to configure your AWS CLI with your credentials. You can do this by running the aws configure command and providing your AWS Access Key ID, Secret Access Key, and default AWS region.
Next, verify that kubectl and eksctl are correctly installed and configured. You can do this by running kubectl version and eksctl version commands. If everything is set up correctly, you should see the versions of kubectl and eksctl displayed in your command line.
Step 2: Creating a VPC for EKS
An Amazon Virtual Private Cloud (VPC) provides a secure and isolated section of the AWS Cloud where you can launch your resources. To create a VPC for your EKS cluster, navigate to the VPC Dashboard in the AWS Management Console and click on Create VPC.
Provide a name for your VPC and specify the IPv4 CIDR block. Next, create a subnet within your VPC. It's essential to create at least two subnets in different Availability Zones for high availability.
Once your VPC and subnets are in place, you'll need to create an internet gateway and attach it to your VPC. This allows your EKS cluster to communicate with the internet.
Step 3: Creating an Amazon EKS Cluster
With your VPC set up, it's time to create your EKS cluster. Navigate back to the EKS service in the AWS Management Console and click on Create cluster. Provide a name for your cluster and choose the Kubernetes version you want to use.
Under the Networking section, select the VPC and subnets you created earlier. Make sure to enable the Public access option so your worker nodes can communicate with the EKS control plane.
Review your cluster configuration and click on Create to initiate the cluster creation process. It might take a few minutes for your cluster to be ready.
Step 4: Configuring kubectl for Amazon EKS
Once your EKS cluster is ready, you need to configure kubectl to communicate with it. You can do this by updating your kubeconfig file with the information about your EKS cluster.
Run the following command in your terminal, replacing <cluster-name> and <region> with the name of your EKS cluster and the AWS region where it's located:
aws eks update-kubeconfig --region <region> --name <cluster-name>
Now, kubectl is configured to manage your EKS cluster. You can test this by running kubectl get svc, which should return a list of services running in your cluster.
Step 5: Launching Worker Nodes for the EKS Cluster
The next step is to launch worker nodes for your EKS cluster. Worker nodes are instances that run your applications and services.
You can use eksctl to create a node group for your cluster. Run the following command in your terminal, replacing <cluster-name>, <region>, and <nodegroup-name> with your cluster name, AWS region, and desired node group name:
eksctl create nodegroup --cluster=<cluster-name> --region=<region> --name=<nodegroup-name>
Step 6: Setting Up Networking and Load Balancing
Networking is a crucial aspect of any Kubernetes cluster. It allows your applications to communicate with each other and the outside world.
By default, Amazon EKS uses AWS VPC CNI for networking. However, you can also use third-party plugins if you have specific networking requirements.
One of the key components of networking in a Kubernetes cluster is the load balancer. AWS EKS supports both Network Load Balancer (NLB) and Application Load Balancer (ALB). The choice between NLB and ALB depends on your application's requirements.
Step 7: Deploying Applications to Your EKS Cluster
With your EKS cluster up and running, you can now deploy applications to it. You can use kubectl to manage your applications.
To deploy an application, you need to create a deployment configuration. This is a YAML file that defines your application and its requirements. See the Kubernetes documentation for examples of deployment manifests and instructions on using them.
Once your configuration is ready, use the kubectl apply command to deploy your application:
kubectl apply -f <your-deployment-file.yaml>
Congratulations! You've successfully built a Kubernetes cluster with AWS EKS.
Conclusion
Building a Kubernetes cluster using AWS EKS provides a simple and secure way to deploy, manage, and run containerized applications. With the power of AWS cloud services behind it, EKS offers a fully managed, Kubernetes-native experience, freeing up teams from the operational complexities associated with running a Kubernetes control plane.
In this article, we've walked you through the steps needed to build your cluster, from initial setup and prerequisites to creating a VPC, configuring networking, launching worker nodes, and finally, deploy applications using kubectl.
AWS EKS's seamless integration with AWS services and functionalities - like auto-scaling and multi-AZ deployments - makes it an ideal choice for teams that want the best of both Kubernetes and AWS ecosystems. With your new EKS cluster up and running, you are now well-equipped to take your containerized applications to the next level.
Technology writer, head of Agile SEO
Popular posts
-
6 Clever Hacks to Skyrocket Your Mobile Organic Search Traffic
- 1
- 0
-
Using Open edX: Definitive guide
- 0
- 0
-
How to free up space on iPad in 5 steps
- 3
- 0
-
How to create a digital bank
- 1
- 0
-
Kubernetes tools, trends, and predictions for 2022
- 2
- 0
-
Machine Learning-powered Demand Forecasting: Transforming The Risk Into Opportunity
- 3
- 1