Almost all Apple product owners know what iTunes is. It is used by millions of users across the globe for importing media files, synchronizing data, shopping at the Apple Store, and many other features. Unfortunately, it is a well-known fact that Apple programs do not work well (and sometimes they work really bad) on the Windows platform, so the question of complete uninstallation and reinstallation of this software has always been a topical issue.
Note: By default, media files purchased from the iTunes Store or songs imported from CDs are stored in the My Music folder. They will not be deleted when iTunes is deleted. Although the possibility to lose any of the iTunes libraries by the following actions is extremely small, it is recommended that you regularly backup your iTunes library.
Before you completely uninstall iTunes there are several considerations. As you may have noticed, other components such as: Apple Software Update, Apple Mobile Device Support, Bonjour, and Apple Application Support are automatically installed to Windows at the same time as iTunes. They are required for updating Apple software, connecting iPhone, iPad and iPod Touch and synchronizing them.
Optionally, the essence of their removal is:
- Finishing iTunes processes;
- Uninstallation of programs (program files);
- Removal of residual files;
- Cleaning up registry entries.
Method 1. Uninstall iTunes using third-party software
We understand that for most users, finding hidden files or cleaning the registry may not be easy. That is why we recommend using this method to uninstall iTunes.
Software developers have been concerned with the issue of comfortable and fast removal of programs for a long time, so now you can download free utilities of this functionality on the Internet. You can learn more about this at 7 best uninstallers. Consider uninstalling iTunes using IObit Uninstaller, which would take just a couple of clicks:
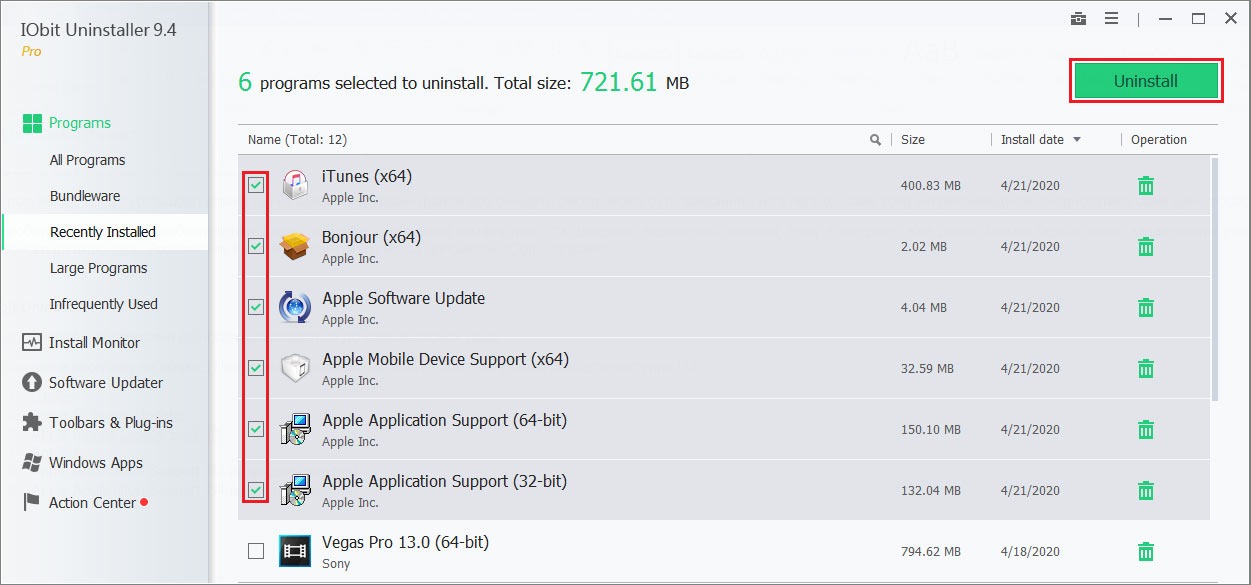
Step 1. Open the program on the Programs tab. Search or sort for the following software:
- iTunes
- Apple Software Update
- Apple Mobile Device Support
- Bonjour
- Apple Application Support (32-bit version)
- Apple Application Support (64-bit version)
Important: Do not remove these components in a different order or entirely. This can have unintended consequences. After removing the component, you may be prompted to restart your computer. Do not restart your computer until all components have been removed.
Step 2. Select the programs exactly as above (to ensure that the uninstallation happens appropriately), then press the large green Uninstall button above.
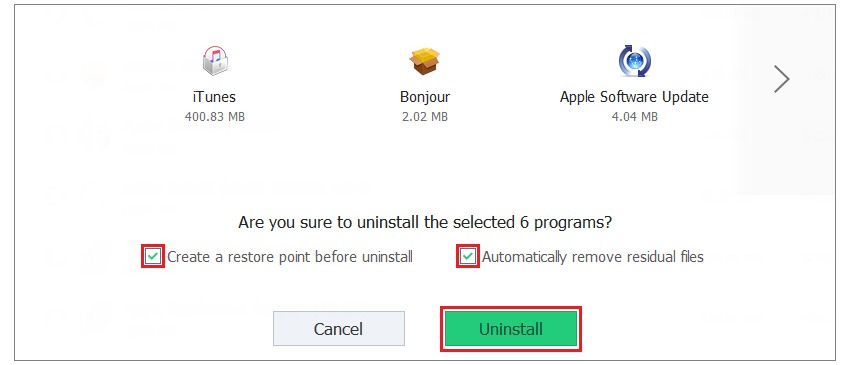
Step 3. Be sure to activate Create a restore point before uninstall. This will prevent any possible errors and, if so, recover all files. Automatic removal of residual files is also recommended for activation, except when an experienced user wishes to leave some files. Press Uninstall again.
Step 4. This is the end of working in the program. Confirm possible removal confirmation requests. Decline application requests to restart the system until all iTunes components have been completely removed. Patiently wait for the completion of the download.
Method 2. Remove iTunes using Windows components (manually)
If the first method doesn’t work for you, you can always use the classic manual method to uninstall iTunes. Like any application, iTunes and its related utilities are removed through Programs and Features or Apps & Features, but you should stop all active iTunes-related processes before doing so.
Step 1. Open Task Manager > Details. You can do this in different ways, like via Ctrl+Alt+Del, or right click on the taskbar (bottom), select Task Manager from the context menu.
Note: Depending on what Apple software is running on your computer, different iTunes processes may be running on Windows. The background processes, Apple server addresses, and ports to which iTunes connects to them are available on the Apple Support page. To completely duplicate them does not make sense, we will list only the basic, which may have to be completed manually.
- AppleMobileDeviceHelper.exe – Tracking management commands to communicate between iTunes and devices.
- AppleMobileDeviceService.exe – iPhone and iPod touch recognition in iTunes.
- iTunesHelper.exe – Tracking management commands to communicate between iTunes and devices (like the iPhone).
These processes work in the background mode, even if iTunes itself is not running.
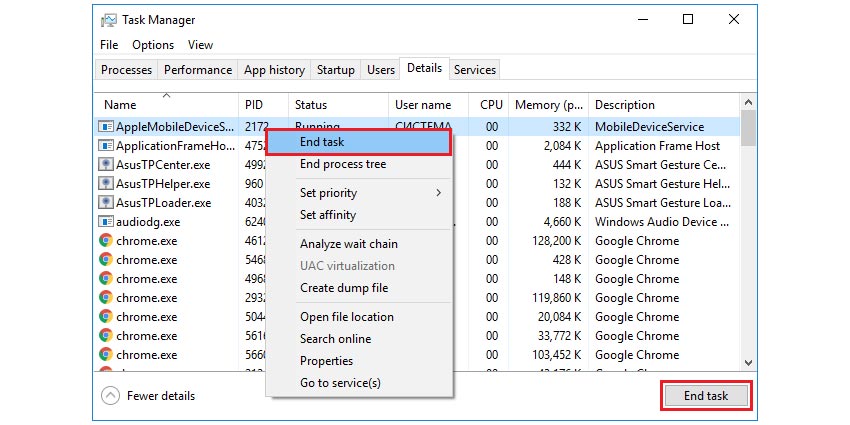
Step 2. All running iTunes-related processes are disabled. Use the context menu or the button below to confirm your selection.
Step 3. Press Win+X > Programs and Features or Start > Settings > System > Apps & Features. Functionally, the two menus are no different, only the interface is different (choose the one that is convenient for you).
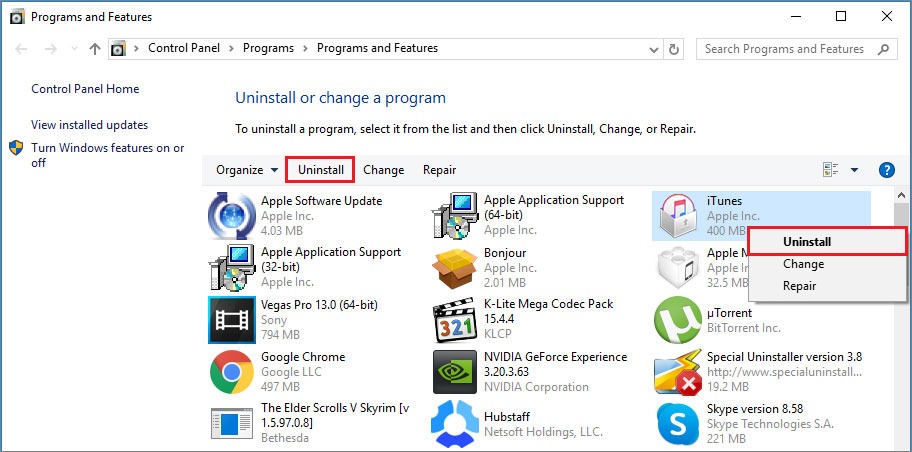
Step 4. One by one (as indicated in Method 1), select and remove programs using the Uninstall button (top or shortcut menu). Confirm your choice.
Note: Do not restart your computer until all components have been removed.
That’s not all: though Apple promises that “in most cases, uninstalling iTunes from the control panel will delete all the auxiliary files”, service folders and some files still remain after uninstalling Apple’s software. You should manually delete them. To do this, proceed to step 5.
Step 5. Delete the following folders with the contents:
- C: \ Program Files \ Common FilesApple \
- C: \ Program Files \ iTunes \
- C: \ Program Files \ iPod \
- C: \ Program Files \ QuickTime \
- C: \ Windows \ System32 \ QuickTime \
- C: \ Windows \ System32 \ QuickTimeVR \
- C: \ Users \ user name \ AppData \ Local \ Apple \
- C: \ Users \ user name \ AppData \ Local \ Apple Computer \
- C: \ Users \ user name \ AppData \ Local \ Apple Inc \
- C: \ Users \ user name \ AppData \ Roaming \ Apple Computer \
Important: If you can’t find folders with these names, go to Control File Explorer > Folder Properties and select the Show hidden files and folders checkbox. Some folders may be missing on your computer, which is normal.
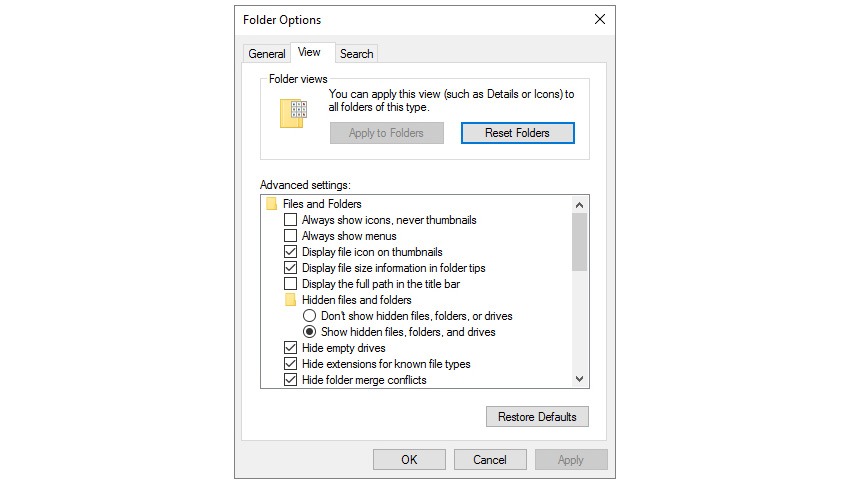
Step 6. Open the registry using Win+R and execute the command regedit. We recommend that you remember this command.

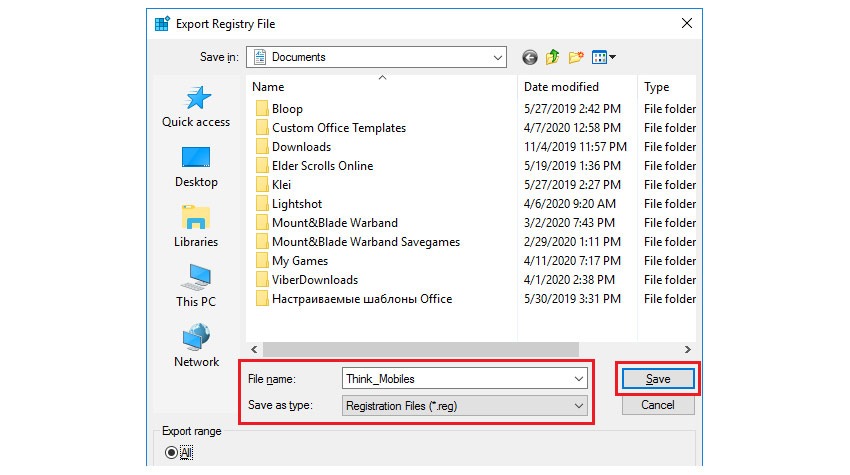
Step 7. Back up the registry just in case. Click File > Export. Specify the file name and location to save it (this file will be a backup of the registry). Click Save. We also recommend that you take the habit of backing up before making changes to any of your PC’s system files, whether it be updating/uninstalling drivers, programs, and more.
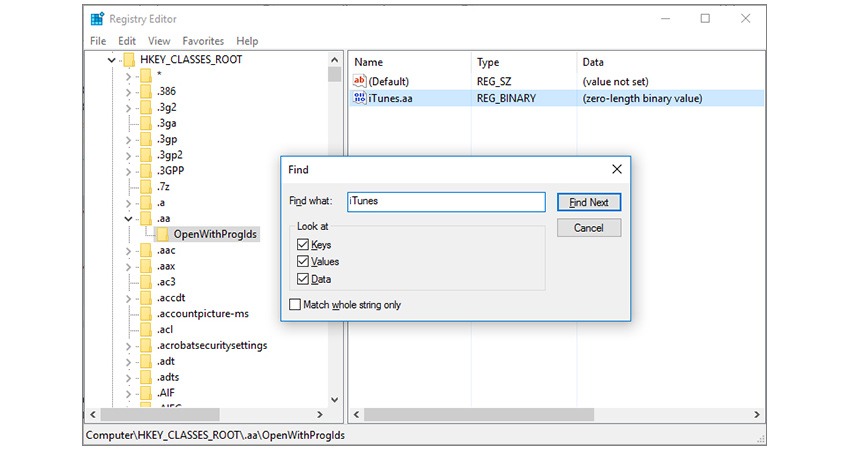
Step 8. You need to delete the remaining registry entries. Use Ctrl+F to call Search and enter iTunes. Then right-click on the found folders or files and press Delete, then press F3 to move to the next folder and repeat the process until you see a notification that the search is complete.
It will also be easier to clean the registry and uninstall iTunes with special software. Some of the most popular are the free CCleaner and the paid Uninstall Tool. The second automatically deletes information about the programs in the registry, so you do not need to search for them manually after uninstalling the program. Learn more at 7 best uninstallers.

